 |
 |
 |
 |
 |
 Easter Egg Bunny Easter Craft for Kids - These cute little bunnies can be made from real eggs or you can use plastic eggs and fill them with treats. They can also be used as place setting for your Easter Feast.
What you will need: Facial tissue (a good, strong brand) I used Puffs with lotions, card stock (heavy paper), scissors, crayons and markers, glue, plastic or real eggs that have been colored.
What to do:
1. Prepare your eggs ahead of time. Color them if you are using real eggs, or fill them with treats if you are using plastic eggs.
2. Draw a rectangle 3/4" x 7 1/2" long onto card stock. Draw legs on the bottom part of the rectangle. Cut the rectangle and legs out so that they are attached. Color them and then glue the ends of the rectangle together to fit snugly around your egg to form a holder for the egg. (Don't glue it to the egg.) Fold the legs up. Draw hands and torso onto the card stock. Cut them out and color them. Glue the hands and torso pattern to the back, inside part of the legs pattern around the ring.
A pattern for this craft is available to members only. Click here to go to the members only section and print out the pattern.
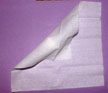
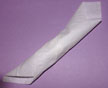
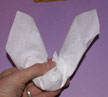
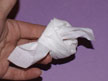
3. To make the bunny heads you will need two facial tissues for each head. Crinkle up one facial tissue into a tight ball. Unfold the other one and place the crinkled up ball in the center. Bring one corner down and over the crinkled up ball. Roll the opposite corner around the crinkled up tissue. Now scrunch up the two corners you haven't used yet into ear shapes. Bring them together over the crinkled up ball that has been rolled inside the tissue. Carefully tie the two ends together over the ball. Pull the ends out and form them into ear shapes.
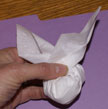
4. Draw eyes and ears on the face and glue it onto the smaller end of the egg. Place the egg and head in the feet holder.
No comments:
Post a Comment